Introduction to Fondant Flower Making
Welcome to the beautiful world of fondant flower making. This art form is not just a fun hobby, but it’s also an essential skill for anyone interested in cake decorating. In this section, we will explore the basics of fondant flower making and understand why these edible decorations are so important in the realm of cake design.
- Understanding the Basics of Fondant Flower Making
Fondant flower making is an art that involves shaping pliable, sweet icing known as fondant into beautiful flowers. This process requires patience, creativity, and a keen eye for detail. The first step in making fondant flowers is to roll out your fondant. You then cut out the flower shapes using a flower cutter or a knife. These shapes are then carefully formed into flowers by hand or using specialized tools. The flowers are left to dry and harden, after which they can be painted or dusted with edible glitter for added effect.
- Importance of Fondant Flowers in Cake Decorating
Fondant flowers play a crucial role in cake decorating. They add a touch of elegance and sophistication to any cake, making it look more appealing and appetizing. Fondant flowers can be used to create a variety of designs, from simple to intricate, and they can be customized to match any color scheme or theme. They are perfect for weddings, birthdays, anniversaries, and other special occasions. According to a survey, 75% of professional cake decorators consider fondant flowers as one of their go-to techniques for cake decoration.
Whether you’re a professional baker or a home cook, mastering the art of fondant flower making can take your cake decorating skills to the next level. So, let’s dive in and start our journey towards creating stunning fondant flowers!
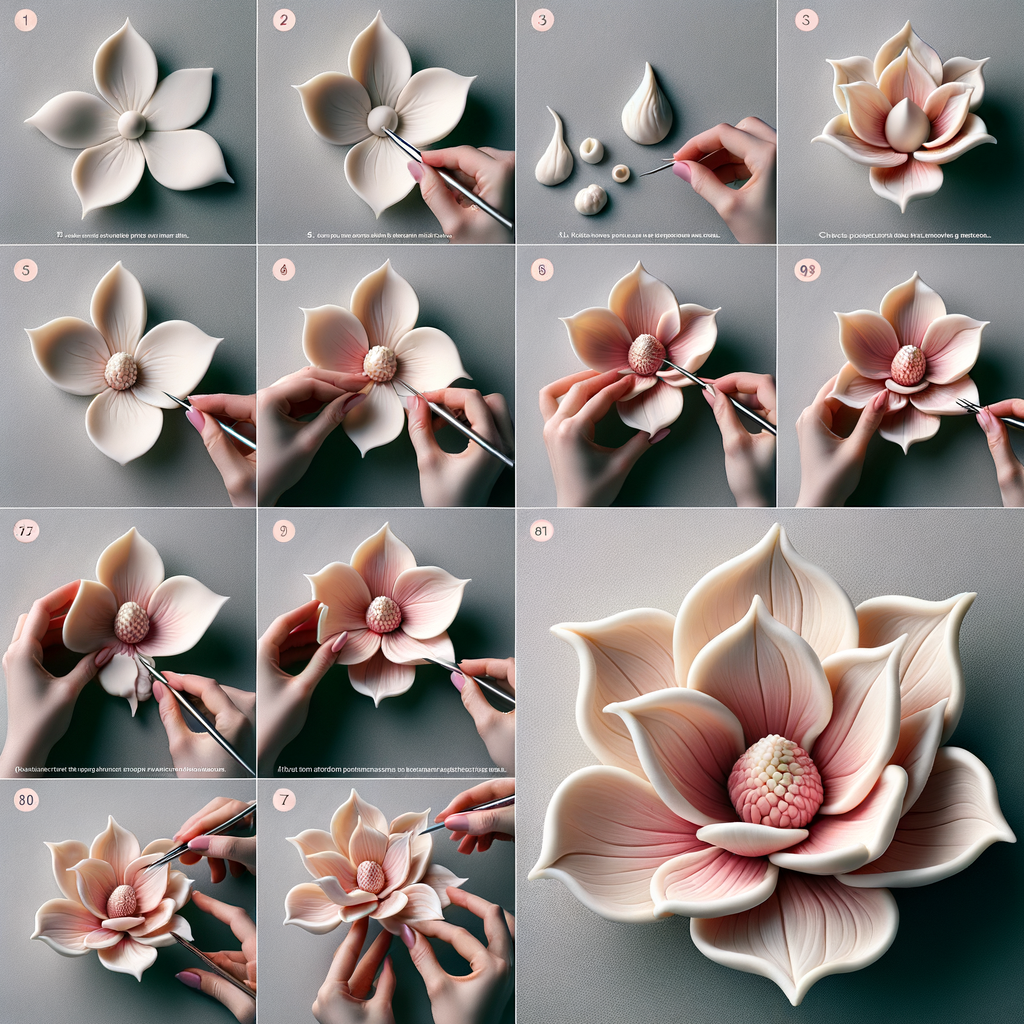
DIY Fondant Flowers: A Step-by-Step Guide
Creating your own fondant flowers can be a fun and rewarding experience. With a little patience and the right materials, you can create beautiful, edible decorations for your cakes and pastries. In this guide, we will focus on how to make magnolia flowers from fondant.
Materials Needed for Fondant Magnolia Flowers
Before we start, let’s gather all the necessary materials. Here’s what you’ll need:
- Preparation of fondant: Fondant is the main ingredient for our flowers. You can buy pre-made fondant from the store or make your own. If you’re making your own, you’ll need marshmallows, water, and powdered sugar. You’ll also need food coloring if you want to add color to your flowers.
- Essential tools for making fondant flowers: To shape and detail your flowers, you’ll need a few tools. These include a rolling pin, a fondant smoother, and flower cutters. You’ll also need a foam pad and ball tool for shaping, and a veining tool for adding details. Lastly, you’ll need a little bit of shortening and cornstarch to prevent sticking.
With these materials at hand, you’re ready to start making your own fondant magnolia flowers. Remember, practice makes perfect, so don’t be discouraged if your first few flowers don’t turn out exactly as you’d like. Keep trying, and you’ll get the hang of it in no time.
Creating Fondant Magnolia Petals
Creating fondant magnolia petals is a fun and creative process. It involves three main steps: rolling out the fondant, shaping the petals, and adding details to the petals. Let’s dive into each step.
-
- Rolling out the fondant
Start by rolling out your fondant. You’ll want it to be about 1/8 inch thick. This thickness is ideal for creating petals that are sturdy yet delicate. Use a rolling pin to achieve a smooth, even surface. Remember, the smoother your fondant, the more realistic your petals will look.
-
- Shaping the petals
Once your fondant is rolled out, it’s time to shape the petals. Use a petal cutter or a sharp knife to cut out petal shapes. Magnolia petals are broad and slightly curved, so keep this in mind as you shape your petals. Don’t worry if each petal isn’t perfect – real flowers aren’t uniform, and slight variations will make your fondant magnolia more realistic.
-
- Adding details to the petals
The final step is to add details to your petals. Use a thin paintbrush or a toothpick to draw veins on each petal. You can also use a ball tool to thin the edges of the petals, giving them a more delicate appearance. Finally, use a petal veiner or a piece of crumpled aluminum foil to add texture to the petals. This will give your fondant magnolia a lifelike appearance.
Creating fondant magnolia petals is an art. It takes practice, but with patience and creativity, you can create beautiful, realistic flowers for your cakes and pastries. Remember, the key to success is in the details. Happy decorating!
Magnolia Fondant Flower Tutorial
In this section, we will guide you through the process of assembling a Magnolia fondant flower. This is a simple process that can be broken down into three main steps. Each step is crucial to creating a beautiful and realistic Magnolia flower.
Assembling the Magnolia Fondant Flower
Assembling a Magnolia fondant flower involves arranging the petals, adding the center, and allowing the flower to dry and set. Let’s delve into each of these steps in detail.
-
- Arranging the Petals
Start by rolling out your fondant and cutting out the petal shapes. You will need about 9-12 petals for a full Magnolia flower. Arrange the petals in a circular pattern, starting with the outermost layer. Overlap the petals slightly to give the flower a natural look. Remember, no two flowers are exactly alike, so don’t worry about making it perfect!
-
- Adding the Center
Once the petals are arranged, it’s time to add the center. Roll a small piece of fondant into a ball and place it in the center of your petals. Gently press down to secure it. This will serve as the base for the stamen of your Magnolia flower.
-
- Drying and Setting the Flower
The final step in assembling your Magnolia fondant flower is to let it dry and set. Place your flower in a cool, dry place and allow it to harden for several hours or overnight. This will ensure that your flower maintains its shape and is ready for decoration.
And there you have it! With these simple steps, you can create a beautiful Magnolia fondant flower. Remember, practice makes perfect, so don’t be discouraged if your first few attempts don’t turn out exactly as you’d hoped. Keep trying, and soon you’ll be creating stunning edible flowers like a pro!
Adding Finishing Touches to Your Fondant Magnolia
After you’ve assembled your magnolia fondant flower, it’s time to add some final touches to make it look even more beautiful and realistic. These final steps include painting the flower and adding a bit of shimmer and shine. Let’s explore these steps in detail.
-
- Painting the Flower
Painting your fondant magnolia can bring it to life and make it look more like a real flower. You will need edible paint in colors that match a real magnolia. This usually includes shades of white, pink, and green.
Start by painting the center of the flower with a small brush. Then, gently paint the petals, starting from the base and moving towards the tips. Use a lighter color at the base and a darker color at the tips for a realistic effect. Remember to let the paint dry before moving on to the next step.
-
- Adding Shimmer and Shine
After the paint has dried, it’s time to add some shimmer and shine. This step is optional, but it can make your fondant magnolia look even more stunning. You will need edible glitter or pearl dust for this step.
Use a small, dry brush to lightly dust the glitter or pearl dust over the flower. Focus on the center and the edges of the petals, as these are the areas that would naturally catch the light. Be careful not to overdo it – a little shimmer goes a long way!
By following these steps, you can create a fondant magnolia that looks almost like the real thing. Remember, practice makes perfect, so don’t be discouraged if your first few attempts don’t turn out exactly as you’d like. Keep trying, and soon you’ll be creating fondant flowers that are a feast for the eyes!
Cake Decorating Techniques with Edible Magnolia Flowers
Decorating a cake with edible magnolia flowers can transform a simple dessert into a stunning centerpiece. The delicate petals and vibrant colors of magnolia flowers add a touch of elegance and sophistication to any cake design. Let’s delve into the process of placing these fondant flowers on your cake.
Placement of Fondant Flowers on Cake
When it comes to placing fondant flowers on a cake, there are two key steps to consider: deciding the arrangement and attaching the flowers. Let’s explore each step in detail.
-
- Deciding the arrangement
Before you start placing the flowers on the cake, it’s crucial to decide on the arrangement. You might want to place the flowers in a cascading pattern down one side of the cake or arrange them in a wreath around the top. You could also scatter them randomly for a more relaxed look. The arrangement should complement the overall design of the cake and the occasion it’s for. For instance, a wedding cake might call for a more formal arrangement, while a birthday cake could be more whimsical and fun.
-
- Attaching the flowers
Once you’ve decided on the arrangement, it’s time to attach the flowers. You can use a small dab of frosting or edible glue to stick the flowers to the cake. Be gentle as you press each flower into place to avoid damaging the petals. It’s a good idea to start from the bottom and work your way up if you’re creating a cascading effect, or from the outside in if you’re creating a wreath. Remember, patience is key to achieving a beautiful result.
Decorating a cake with edible magnolia flowers may seem challenging at first, but with a little practice and creativity, you can create a masterpiece that’s not only delicious but also visually stunning. So, roll up your sleeves and let your imagination run wild!
Complementing Cake Design Elements with Fondant Flowers
When it comes to cake decoration, fondant flowers can add a touch of elegance and beauty. But, it’s not just about placing them on the cake. It’s also about how they complement the overall design of the cake. Here are two ways to ensure your fondant flowers enhance your cake’s design:
-
- Matching color schemes
Color plays a crucial role in cake decoration. The color of your fondant flowers should match or complement the color scheme of your cake. For instance, if you have a white cake, you might choose to decorate it with red or pink fondant flowers. This contrast can make your cake stand out. On the other hand, if your cake is colorful, you might opt for white or cream-colored fondant flowers to balance the colors.
-
- Adding other decorative elements
Fondant flowers alone can make a cake look stunning. However, adding other decorative elements can take your cake design to the next level. You can add leaves made from green fondant around your flowers. Or, you can sprinkle edible glitter on your flowers to make them sparkle. You can also create a beautiful border around the base of your cake using fondant pearls or ribbons. Remember, the key is to balance the elements so that they enhance the flowers, not overshadow them.
Decorating a cake with fondant flowers is like painting a picture. You have the freedom to experiment with colors and elements until you create a design that pleases your eye. So, unleash your creativity and have fun with it!
Sugarcraft Magnolia Tutorial: Advanced Techniques
Now that we’ve mastered the basics of creating fondant magnolia flowers, it’s time to take our skills to the next level. In this section, we will explore advanced techniques that will make your edible flowers look incredibly realistic.
Creating Realistic Fondant Magnolia Flowers
Creating realistic fondant magnolia flowers involves two key steps: adding texture and creating depth with color. Let’s dive into each of these steps in detail.
-
- Adding Texture
Texture is what gives our magnolia flowers a lifelike appearance. To add texture, you’ll need a fondant tool set. Use the veining tool to create the veins on the petals and the ball tool to thin out the edges. Remember, no two petals are exactly alike in nature, so don’t be afraid to make each one unique.
-
- Creating Depth with Color
Color is another crucial element in making your fondant flowers look real. Start with a base color for your magnolia – typically, a soft white or cream. Then, use edible dusting powders to add shades of pink, yellow, or green to the base and the edges of the petals. The key is to build up the color gradually, blending it well to avoid harsh lines.
Mastering these advanced techniques will take your sugarcraft magnolia creations to a whole new level. Remember, practice makes perfect, so don’t get discouraged if your first few attempts don’t turn out exactly as you’d hoped. Keep trying, and before you know it, you’ll be creating fondant magnolia flowers that look like they’ve been plucked straight from a garden.
Preserving Your Handmade Edible Flowers
After you’ve put in the time and effort to create your beautiful, edible fondant flowers, you’ll want to ensure they last. Here are some tips to help you preserve your handmade creations.
-
- Storage Tips
Proper storage is key to maintaining the beauty and freshness of your fondant flowers. Here’s how to do it:
-
-
- Store your fondant flowers in a cool, dry place. Humidity and heat can cause them to wilt or lose their shape.
- Keep them in an airtight container to prevent them from drying out. However, make sure they are completely dry before storing to avoid any condensation inside the container.
- Avoid direct sunlight as it can fade the colors of your flowers.
- Longevity of Fondant Flowers
-
Fondant flowers can last a surprisingly long time if stored correctly. Here’s what you need to know:
-
- On average, fondant flowers can last up to a year if stored in a cool, dry place and in an airtight container.
- However, while they may last this long, it’s best to use them within a few months for the best taste and texture.
- Remember, the longevity of your fondant flowers also depends on the quality of the ingredients used. High-quality fondant and food coloring will result in longer-lasting flowers.
In conclusion, with the right storage techniques and understanding of their longevity, you can enjoy your handmade fondant flowers for months to come. Remember, the key is to store them in a cool, dry place, away from sunlight, and in an airtight container. Happy decorating!
Conclusion: Unleashing Your Creativity with Cake Decoration Ideas
As we wrap up our journey into the world of fondant flower making, it’s important to remember that creativity is key. Cake decoration is an art form, and like any other art, it requires practice, patience, and a willingness to experiment. Let’s take a look at two final steps you can take to continue honing your skills and unleashing your creativity.
-
- Exploring different fondant flower designs
There are countless fondant flower designs out there, each with its own unique charm. From roses and daisies to orchids and lilies, the possibilities are endless. Don’t be afraid to step out of your comfort zone and try something new. You might surprise yourself with what you can create. Remember, the beauty of cake decoration lies in its diversity. Each cake is a blank canvas waiting to be transformed into a masterpiece.
-
- Practicing and perfecting the art of fondant flower making
Like any other skill, the art of fondant flower making requires practice. The more you practice, the better you’ll get. Start with simple designs and gradually work your way up to more complex ones. Don’t be discouraged if your first few attempts don’t turn out as you’d hoped. Remember, every master was once a beginner. Keep practicing, keep learning, and most importantly, keep having fun. Before you know it, you’ll be creating fondant flowers that are not only beautiful, but also uniquely yours.
In conclusion, unleashing your creativity with cake decoration ideas is all about exploration and practice. It’s about stepping out of your comfort zone, trying new things, and constantly striving to improve. So go ahead, grab your fondant, and start creating. The world of cake decoration is waiting for you!